2019. 10. 22. 17:05ㆍOS
Here’s how you can install macOS Sierra Final in VirtualBox on Windows 10.
Note
This guide is using macOS Sierra 10.12 which is the final version. If you instead don’t want to get macOS Sierra and you are looking for the newer version which is macOS High Sierra then you can always follow this guide
meet VirtualBox
VirtualBox is one tiny, powerful dude, and it is capable of installing macOS onto your Windows 10 computer as an app.
It works like a charm with Sierra, but before you get onto the guide, there are three little requirements that your Windows 10 computer is going to need in order for you to install the macOS onto your computer.
The minimum requirements that you are going to need are:
• a 64-Bit Computer
• at least 4GB RAM
• a Dual-Core processor
Got all of that? Splendid! Once you have got that out of the way, you can now proceed to install macOS Sierra in VirtualBox on Windows 10.
Here are the links to the downloads that you’ll be needing to install macOS Sierra onto your VirtualBox successfully.
Download (Updated February 2019)
macOS Sierra 10.12 Final (One Full)
macOS Sierra 10.12 Final (5 of 5)
All credit goes to Techsviewer for the files. If the files are removed, you can comment down below or subscribe to Saint (the fastest way to reach us).
Now I know what you’re thinking, “Which one of the two macOS Sierra 10.12 Final download links should I download from?”
The reason why I have included two Google Drive download links for you is that the (One Full) download link has the entire macOS Sierra 10.12 Final file from Apple as one 5GB file. So if you are alright with letting your computer run all night to download the 5GB file then you can go for this
The (5 of 5) download link has the entire macOS Sierra 10.12 Final file as 5 separate 1GB files, so if your internet connection is pretty weak or if you just simply want to take your time and download one by one then you can go for this.
Once, you are done with the download ‘stuff’, you can now go on with the 5 quick and simple steps below.
How to Install macOS Sierra in VirtualBox on Windows 10: 5 Steps
Step 1: Extract the Image File with Winrar or 7zip.
The first thing that you should do is go ahead and install WinRAR. (I have included the latest (March 2018) link for WinRAR for you)
Once you have done that, right click on the macOS 10.12 Sierra file that you’d downloaded.
Then select Extract Here.

Like this.
Note
Also, make sure that you have enabled Virtualization in your computer’s BIOS.
You can use this helpful guide:
Enabling Virtualization in your PC BIOS – Berkeley Common
Step 2: Install VirtualBox
Download the latest version of VirtualBox (I have included the latest (June 2018) link for VirtualBox for you above)
It’s pretty easy to install VirtualBox. Just keep clicking Next and then Finished and you’re good to go.

Step 3: Create a New Virtual Machine
Now you have to create your new Virtual Machine. So what you have to do is, open the VirtualBox you’ve just downloaded.
Next click on New which you can see to your upper left-hand side.
Sweet! Now all you have to do is follow on by adding each of the below details into each of the fields.
Name: macOS 10.12 Sierra
Type: Mac OS X
Version: Mac OS X 10.11 El Capitan (64 bit) or 10.12 Sierra
Memory size is 4 GB ( 70% of your Ram )
Virtual disk file: macOS 10.12 Sierra.vmdk

Step 4: Edit Your Virtual Machine
Once you have created your Virtual Machine, now it’s time to edit it. So first tap on Settings.
Then, you should be able to see General to your right-hand side, so put everything into default there.
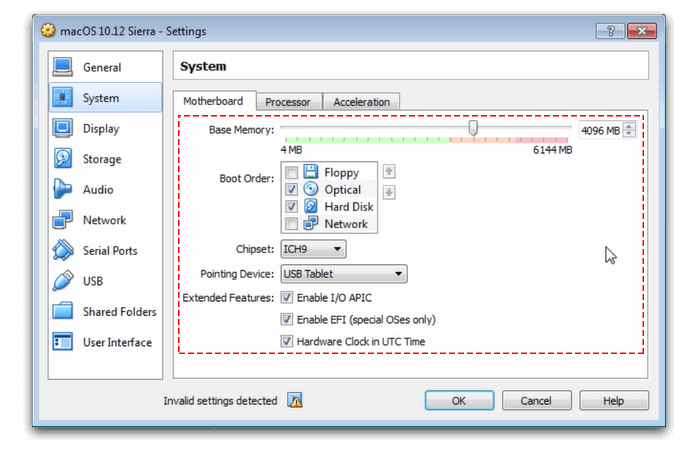
After that, under General, you should be able to see the System. Click that.
You’re doing a great job so far! Alright, from here onwards, it’s pretty shit easy. You just have to follow what I selected for each of the fields based on the pictures below.
CPU: Select 2 CPU (you can choose more than 2 if you want but it is entirely according to your CPU) and then enable PAE/NX

System: Now you have to enable EFI and then disable Floppy. Next, make sure you choose the Chipset as IHC9 (you can also choose PIIX3)
Graphics: Set your Video Memory to 128MB

Storage: Finally, choose your macOS 10.12 Sierra.vmdk and make sure that under Attributes, you set the Hard Disk to SATA Port 0. Once done, click OK.

Note
Now close your VirtualBox. Then proceed with the next step.
Step 5: Add Code to VirtualBox with Command Prompt (cmd)
Before you add the code onto VirtualBox with your Command Prompt, you have a few little changes that you have to make things easier for you.
Replace the phrase “Your VM Name” in the code (below) with your own virtual machine name which you can find in General, then under Basic. It’s best if you copy the code below into your Notepad and then replace the areas where it says “Your VM Name” with your own virtual machine name before moving on the next step.
Code for Virtualbox 5.x.x and Virtualbox 6.x.x
cd "C:\Program Files\Oracle\VirtualBox\" VBoxManage.exe modifyvm "Your VM Name" --cpuidset 00000001 000106e5 00100800 0098e3fd bfebfbff VBoxManage setextradata "Your VM Name" "VBoxInternal/Devices/efi/0/Config/DmiSystemProduct" "iMac11,3" VBoxManage setextradata "Your VM Name" "VBoxInternal/Devices/efi/0/Config/DmiSystemVersion" "1.0" VBoxManage setextradata "Your VM Name" "VBoxInternal/Devices/efi/0/Config/DmiBoardProduct" "Iloveapple" VBoxManage setextradata "Your VM Name" "VBoxInternal/Devices/smc/0/Config/DeviceKey" "ourhardworkbythesewordsguardedpleasedontsteal(c)AppleComputerInc" VBoxManage setextradata "Your VM Name" "VBoxInternal/Devices/smc/0/Config/GetKeyFromRealSMC" 1
You’re almost done! Now, all that you have to do is find your Command Prompt (cmd) and Run as an administrator.

Finally, add the code one by one into your Command Prompt. Take all the time in the world that you need.

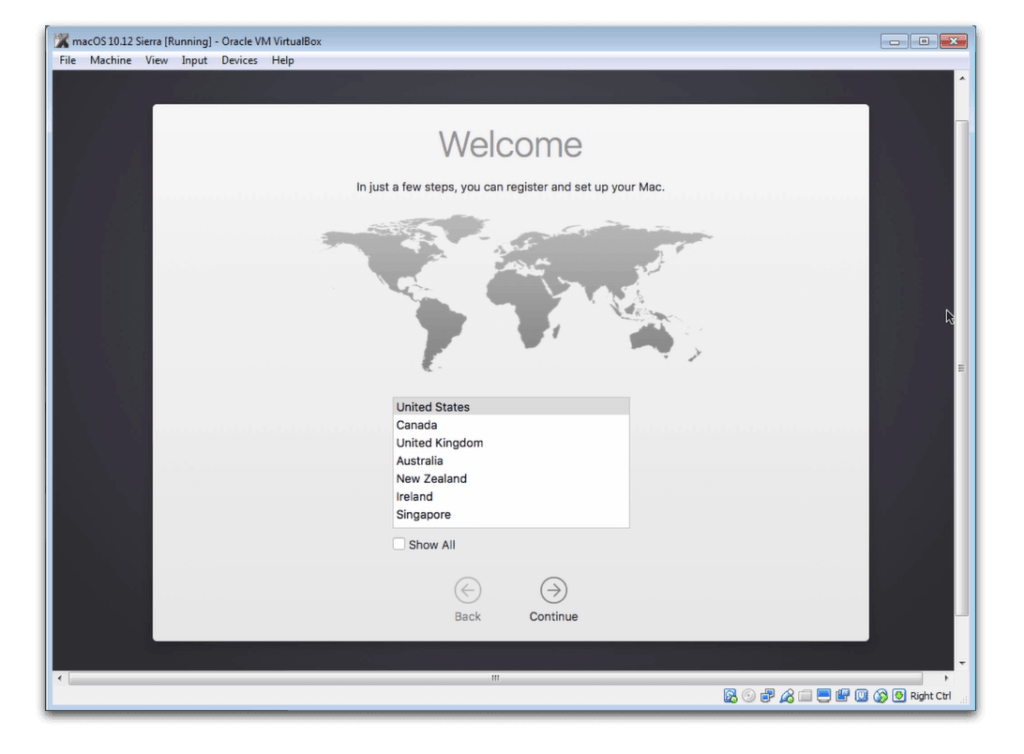
Done! Run Your Virtual Machine
That’s it, you did a great job!
Now you can go ahead run your Virtual Machine new macOS Sierra in your VirtualBox on your Windows 10 computer.
Open your VirtualBox then click on Start or Run the macOS Sierra VM. and run your Virtual Machine new macOS Sierra in your VirtualBox on your Windows 10 computer.
Again you’ll see another black screen with all geeky code on it. Don’t worry, it’s just doing its thing. You can go grab a donut whilst you’re at it.
From here on out, you can continue on with Sierra’s introduction.

Don’t forget to share this guide!
설치 과정에서 오류 발생 시 대처 방법
1. 설치 디스크 선택 화면에서 선택할 디스크가 없는 경우
설치를 진행하기 전에 먼저 Disk manager를 실행한 후 Mac os 를 설치할 Partition 생성을 먼저 실행해 주면 해결이 됨.

2. Install 작업 진행 후 첫번째 부팅 과정에서 “Boot Failed. Mac OS X” 오류가 발생하는 경우
- 원인 : VirtualBox 가 새로운 디시크를 인지하지 못해서 발생하는 것임.
- 해결 방법
1) Virtual machime을 Restart
2) 새시작과 동시에 Fn + F12 버튼을 빠르게 누러줌
3) 아래와 유사한 화면이 나타님

4) Boot Maintenance Manager — Boot from File — [PciRoot(0x0)/Pci (0x1F, 0x2) /Sata (0x0, 0x0, 0x0) /HD(2,GPT, …………]

5) macOS Install Data — Locked Files — Boot Files — boot.efi.
설정은 완료 되었고, 재시작이 이루어지고, 이제 정상적으로 설치가 진행되는 것을 확인할 수 있음.

'OS' 카테고리의 다른 글
| TLS 1.0, 1.1 지원 삭제 (2020년 완료 예정) (0) | 2019.11.21 |
|---|---|
| 맥에서 TCPDUMP로 패킷 캡쳐하기 (0) | 2019.11.21 |
| dmidecode - 리눅스 물리 메모리 용량, 제조사 등 확인 방법 (0) | 2019.11.13 |
| 리눅스 메모리 용량 확인 (0) | 2019.10.23 |
| 리눅스 CPU 정보 확인하기 (0) | 2019.10.23 |